If you have used the Access Control System (ACS) and using its APP ID and APP Secret in the PnP.PowerShell module it may not work.
The Connect-PnPOnline will work fine but when I try to get any command to make it work you will get the following (401) Unauthorized error. I have given Full Control for the Site Collection.
PS C:\WINDOWS\system32> Get-PnPList -Connection $conn1
Get-PnPList : The remote server returned an error: (401) Unauthorized.
At line:1 char:1
+ Get-PnPList -Connection $conn1
+ ~~~~~~~~~~~~~~~~~~~~~~~~~~~~~~
    + CategoryInfo          : WriteError: (:) [Get-PnPList], WebException
    + FullyQualifiedErrorId : EXCEPTION,PnP.PowerShell.Commands.Lists.GetList

PS C:\WINDOWS\system32>
The answer lies in the tenant-wide flag “DisableCustomAppAuthentication”. This is because ACS is retired, and it should not be used for the new application. It is still supported for backward compatibility, but it is recommended use the “Sites.Selected” permission.
After disabling the above flag the PnP command works.
Conclusion
You can fix the ACS mechanism for your app temporarily, but it is “highly” recommended that you migrate the code to the new Authentication on the Azure AD.
Please see the following article for the “Sites.Selected” permission.
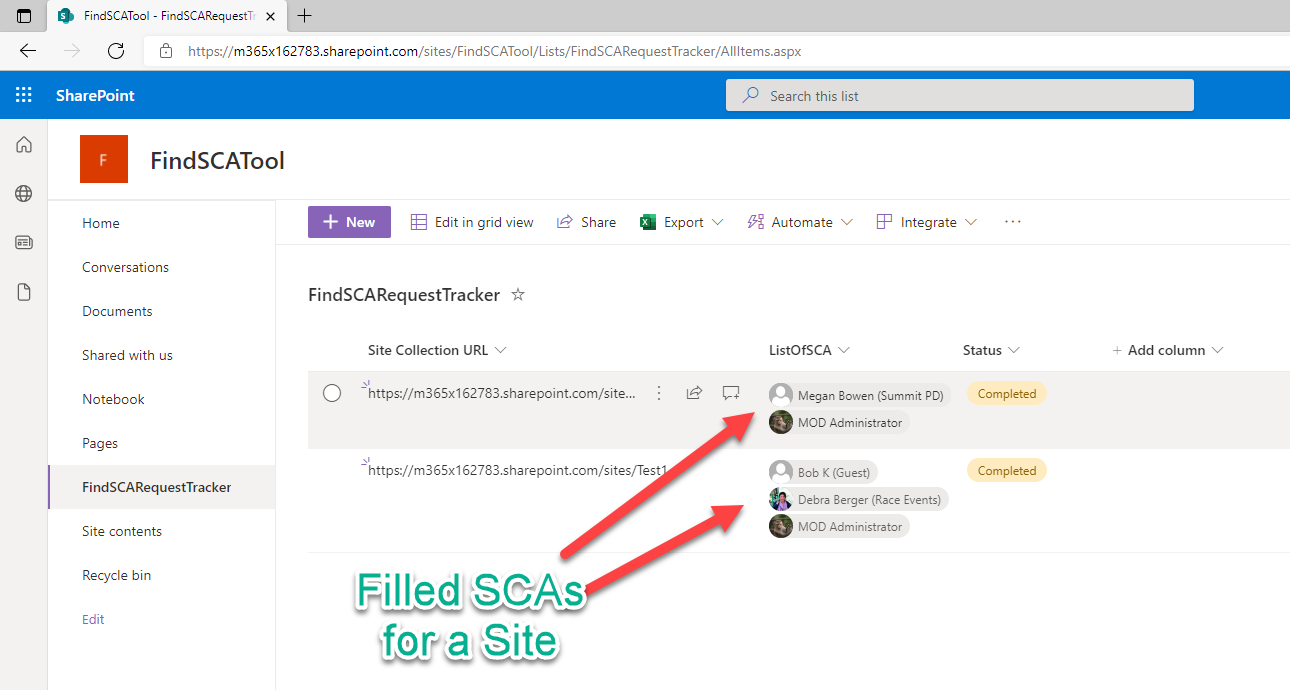
My customer had a requirement to get the list of Site Collection Admins (SCAs) for any site within the tenant for anyone in the organization. The need of the user is to find additional information from the SCA.
This request can be on-demand from any user within the organization. The resolution is to have a tool for a user to request a site URL. Using the user’s Site URL request the tool can find out the SCAs for the site. The tool will fill out the Multi People field for the same request.
This tool as “Find SCAs Tool”
Prerequisite
“FindSCARequestTracker” SharePoint List
Azure Logic
Azure Function
PnP.PowerShell
Step By Step Solution
Step # 1 : Create a “FindSCARequestTacker” SharePoint List
The logic app will trigger on items created or modified for the above SharePoint list. The trigger condition for this is to check only trigger the flow when the Status field is New.
There are only two actions in the flow. The first action is to make a call to an HTTP Trigger Azure Function. The second call is to Update the SharePoint item. The update is updating the “Status” field as Completed and the “ListOfSCA” field with the results from the Aure Function.
The Logic App with the two main actions.
Step # 3: “find-sca-by-site” Azure Function.
The “find-sca-by-site” Azure Function is set as an HTTPTriggered function. The input to the to the call is the JSON value with the Site URL. The output of this function is also JSON with the Claims array with the email address of the SCAs.
NOTE: To get to the code for the above Azure function, please click here.
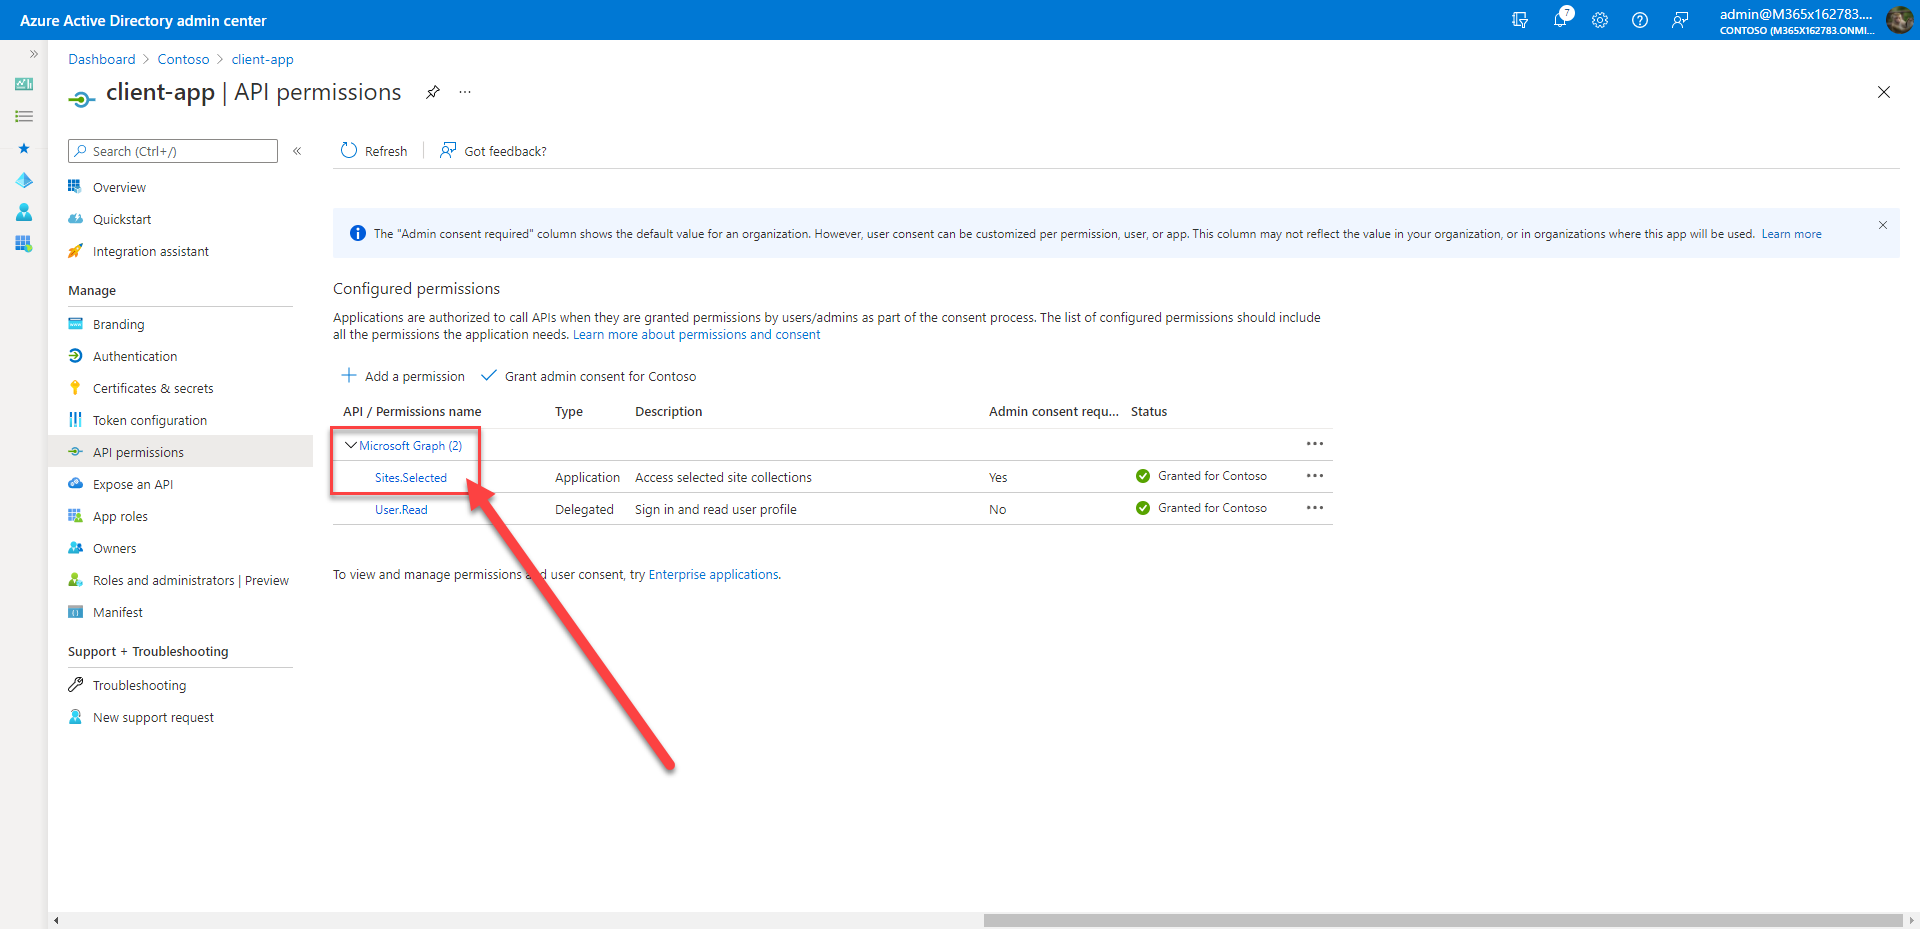
Please make sure the Azure AD app you create has the following permissions.
The Azure AD required permissions
Results
The results after the Azure Logic App and Azure Function are executed for a request.
Conclusion
With help of the Azure resource to get the list of Site Collections Admins can be created as a Tool. This will help reduce SPO admins’ tasks and the tools can provide information on what a user needs.
Earlier, I posted an article regarding the “Sites.Selected” MS Graph permission to create the granular permissions for sites. The following is the link for the article.
This is all great that granting and revoking “granular” permission for reading or writing for the site can be controlled by the Admins. However, there are some gaps such as how the governance can be maintained. It is the Admin’s additional task to execute the scripts and to maintain the list of the Azure AD applications, sites, and permissions. Additionally, based on the tenant size and to execute the users’ requests to get access to sites can be Admins nightmare.
This article will address the above weaknesses by giving you steps to design and develop a tool to maintain the users’ requests. Also will guide you to automate the granting and revoking sites permissions.
I named the tool Sites Selected Request Tracker (SSRT)
Prerequisites
The following resources are required for the tool.
Pnp.PowerShell – The PnP.PowerShell is used in the Azure Function to maintain the tracker list.
Two SharePoint Lists – The SharePoint lists are required to track the list of Azure AD application IDs and the users’ permission requests.
Azure Logic Apps – The Azure Logic Apps is required to trigger a flow on the request tracker list’s create or modify. Based on the grating or revoking trigger change it will also make a call to Azure Function.
Azure Function – The Azure Function is required to execute the Grant and Revoke using the PnP.PowerShell. This is the real engine that will automate the task.
Azure Key Vault – The Aure Key Vault is needed to store the Certificates for the Azure AD app. Please read the previous article for more information.
Architecture Diagram
The logical architecture diagram for the SSRT tool.
Architecture Diagram for the Sites Selected Request Tracker (SSRT)
SharePoint List One – CustomerAppIDs Columns
This first list will have the list of all Azure AD apps (consented “Sites.Selected” permission). You can use the client secret or certificate. It is recommended to use the certificate for each Azure AD app.
Internal Name
Display Name
Column Type
Title
App ID GUID
Single line of text
AppName
App Display Name
Single line of text
SharePoint List One – CustomerAppIDs Columns
SharePoint List Two – SitesSelectedTracker Columns
This is the second list which keeps the track of the all the requests for sites. After adding the Azure AD app information in the first list, the Admins will add the sites for a specific Azure AD application with the Read or Write selection. Whenever the Admins makes change the item to Revoke the Logic App will revoke and delete the item from the tracker list.
Internal Name
Display Name
Column Type
Description
1
Title
Site URL
Single line of text
To store url needs perms
2
ApplicationID
ApplicationID
Lookup
Reference to app id and AppName columns from the above list.
3
ReadWrite
Read Or Write
Choice
Read or Write Choice. Default as Read.
4
GrantRevoke
Grant Or Revoke
Choice
Grant or Revoke choice. Default as Grant
5
ReadWriteCopy
ReadWriteCopy
Single line of text
Used internally for the flow. Hidden from the user. Default is None
6
GrantRevokeCopy
GrantRevokeCopy
Single line of text
Used internally for the flow. Hidden from the user. Defaultis Grant.
7
RecordEngineSteps
RecordEngineSteps
Enhanced rich text
Used internally for the flow. Hidden from the user to enter. Engine uses to add steps description.
SharePoint List Two – SitesSelectedTracker Columns
“ProcessReadWrite” Azure Logic Apps
The Logic Apps triggers on the item create or modified on the SitesSelectedTracker.
Trigger conditions is
To Check ReadWrite to ReadWriteCopy are not equal OR
To Check GrantRevoke to GrantRevokeCopy are not equal.
If the above condition is met then the Azure Logic App makes a call to the “SPOSiteSelected” Azure Function with the following parameters.
# The following request body is passed to the Azure Function.
{
  "Action": "@{triggerBody()?['GrantRevoke']?['Value']}",
  "ClientAppID": "@{triggerBody()?['ApplicationID']?['Value']}",
  "DisplayName": "@{triggerBody()?['ApplicationID_x003a_AppName']?['Value']}",
  "Permission": "@{triggerBody()?['ReadWrite']?['Value']}",
  "SiteURL": "@{triggerBody()?['Title']}"
}
NOTE: To get to the code for the above Azure function, please click here.
A customer got the following error for removing a sub-site.
PS C:\Temp> Remove-PnPWeb -Identity testcaa -Force
Remove-PnPWeb : The attempted operation is prohibited because it exceeds the list view threshold.
At line:1 char:1
+ Remove-PnPWeb -Identity vacaa -Force
+ ~~~~~~~~~~~~~~~~~~~~~~~~~~~~~~~~~~~~
    + CategoryInfo          : WriteError: (:) [Remove-PnPWeb], ServerException
    + FullyQualifiedErrorId : EXCEPTION,PnP.PowerShell.Commands.RemoveWeb

PS C:\Temp>
Clearly, the issue was due to a large list or lists present in the sub-site. Since the entire subsite needs to be deleted with the large list, to eliminate the above error the large list must be deleted first.
The following code can be useful to remove the items from the large list and it allowed to delete the list. Once all large lists were deleted the subsite was successfully deleted.
$action = "Delete"
# TODO Change your site or subsite URL
$siteUrl = https://[YOUR TENANT].sharepoint.com/sites/Contoso/testcaa
# TODO Change the list name
$listName = "Contoso Community Care Data"
$ErrorActionPreference="Stop"
Connect-PnPOnline –Url $siteUrl -UseWebLogin
$Stoploop = $false
[int]$Retrycount = "0"

write-host $("Start time " + (Get-Date))
do {
  try {

    if($action -eq "Delete")
    {
      $listItems= Get-PnPListItem -List $listName -Fields "ID" -PageSize 1000
      $itemIds = $lisItems | Foreach {$_.Id}
      $itemCount = $listItems.Count
      while($itemCount -gt 0)
      {
        $batch = New-PnPBatch
        #delete in batches of 1000,
        #if itemcount is less than 1000 , all will be deleted
        if($itemCount -lt 1000)
        {
          $noDeletions = 0
        }
        else
        {
          $noDeletions = $itemCount -1000
        }
        for($i=$itemCount-1;$i -ge $noDeletions;$i--)
        {
          Remove-PnPListItem -List $listName -Identity $listItems[$i].Id -Batch $batch
        }
        Invoke-PnPBatch -Batch $batch
        $itemCount = $itemCount-1000
     }
   }
   Write-Host "Job completed"
   $Stoploop = $true
  }

  catch {

    if ($Retrycount -gt 3){

       Write-Host "Could not send Information after 3 retrys."

       $Stoploop = $true

    }

    else {

      Write-Host "Could not send Information retrying in 30 seconds..."

      Start-Sleep -Seconds 30

      Connect-PnPOnline –Url $siteUrl -interactive

      $Retrycount = $Retrycount + 1

    }
  }
}
While ($Stoploop -eq $false)
write-host $("End time " + (Get-Date))
Conclusion
To delete any site the large lists items and list must be deleted first. Once that is done the site or subsite can be deleted.
To provide granular access for the sites the Azure Access Control (ACS) was used in the past. The app id and secret can be created using the add-ins, more info is described here. Note: Please check ACS retirement info.
Now with the new Sites.Selected MS Graph permission you can use the granular level permission. This blog post is just to simplify and demonstrate the use of PnP PowerShell to create granular permissions.
For example, if the customer wants to have access to a few sites as a read permissions the “Site.Selected” permission techniques can be used to meet the need.
Step by Step Solution
Step # 1 Create Azure AD app with MS Graph Sites.FullControl.All permission
NOTE: Make sure you select MS Graph not SharePoint, as it also has the same permission but that is not valid.
Please make a note of the application id.
Admin App
Step # 2 Create Azure AD app with MS Graph Sites.Selected permission
Client-AppAdd SharePoint Sites.Selected permission also if you are using PnP.PowerShell.
Step # 3 Create a PFX and CER certificate using PnP PowerShell.
The above command will create two files, store them in the known directory.
Step # 4 Upload the CER file to the Azure AD app created in Step #1 i.e. Admin app.
Step # 5 Using PnP PowerShell command Grant-PnPAzureADAppSitePermission
$adminAppId = "9a6f4c8a-e9cf-44fd-b3ad-4413ed66a2ce"; #admin-app TODO to replace
$clientAppId = "ca2a60c7-d09a-4875-841b-117a02b504fd"; #client-app

$tenantPrefix = "M365x162783"; # replace with your tenant id TODO to replace
$tenantName = $tenantPrefix +".onmicrosoft.com";
$spoTenantName = "https://" + $tenantPrefix + ".sharepoint.com";

# site to apply granular permission,
# it can be repeated for more than one sites
$site2apply = "https://m365x162783.sharepoint.com/sites/lbtest1"

$password = (ConvertTo-SecureString -AsPlainText 'pass@word1' -Force)

$adminConn = Connect-PnPOnline -Url $spoTenantName -ClientId $adminAppId -CertificatePath 'c:\Temp\pnpSites-Selected.pfx' -CertificatePassword $password  -Tenant $tenantName


#### GRANT
Grant-PnPAzureADAppSitePermission -AppId $clientAppId -DisplayName "Thisapp" -Permissions Read -Site $site2apply -Verbose
Step # 6 To check the client app has an access to read lists of the site
$clientAppId = "ca2a60c7-d09a-4875-841b-117a02b504fd"; #client-app

$tenantPrefix = "M365x162783"; # replace with your tenant id TODO to replace
$tenantName = $tenantPrefix +".onmicrosoft.com";

$site2apply = "https://m365x162783.sharepoint.com/sites/lbtest1"

$clientConn = Connect-PnPOnline -Url $site2apply -ClientId $clientAppId -CertificatePath 'c:\Temp\pnpSites-Selected.pfx' -CertificatePassword $password  -Tenant $tenantName

Get-PnPList
Click here to see the code for how to read all lists using non-PnP command i.e. REST calls.
Step # 7 To change the permission from “Read” to “Write”.
NOTE: The following code is an extension from the above code variables set in the above steps.
This article will show the step-by-step PowerShell commands to read the raw data from the certificate.
Prerequesite is you need to create a sample PFX file. It is very easy to create such files using the PnP Powershell module.
## create C:\Certs and run the following command.

New-PnPAzureCertificate -OutPfx wildcard.pfx -OutCert wildcard.cer -CertificatePassword (ConvertTo-SecureString -String "pass@word1" -AsPlainText -Force)
# the following command will be used to read the PFX file and get the cert value.

$pfxPath = "C:\Certs\wildcard.pfx"
$pfxPass = "pass@word1"
$stsCertificate = New-Object System.Security.Cryptography.X509Certificates.X509Certificate2 $pfxPath, $pfxPass, 20
$binCert = $stsCertificate.GetRawCertData()
$credValue = [System.Convert]::ToBase64String($binCert)
Now using the above $credValue you can use to connect to the PnP Online. Assuming you have created an Azure AD app, added the required permissions, and added the above-created cert to the app.
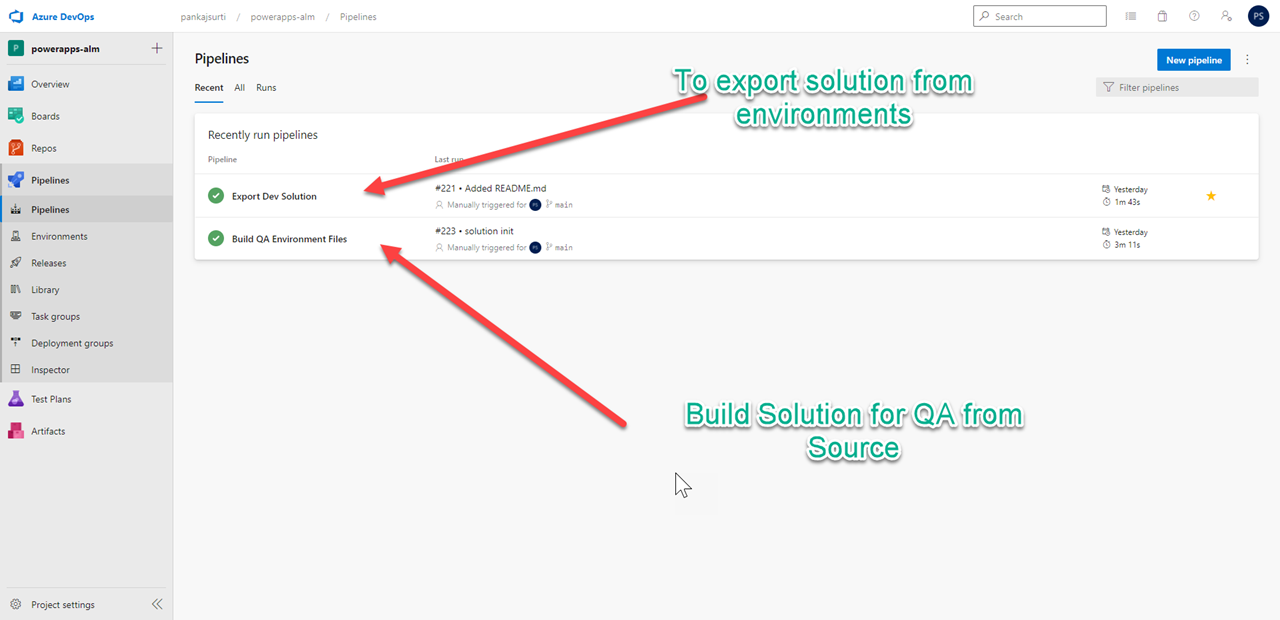
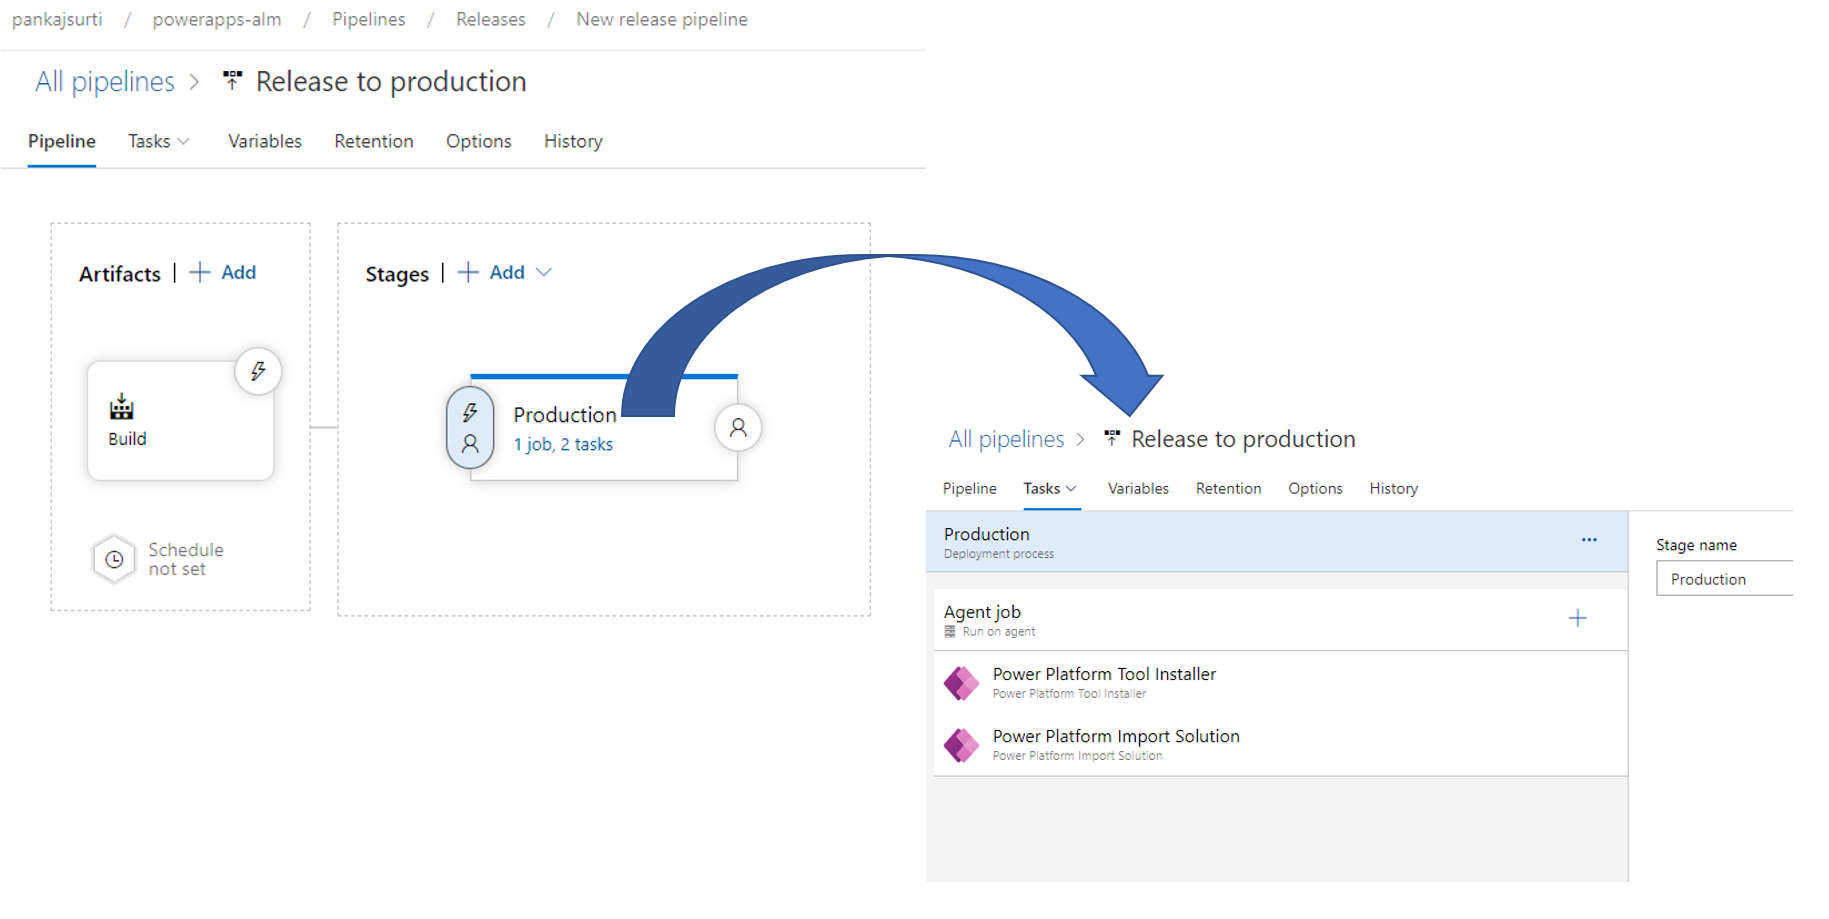
You will have two build pipelines and one release pipeline.
1. Create two build pipelines
Follow the following steps to create a pipeline.
Click on Newpiple
Select the “Use the classic editor” link
Select Azure Repos Git. Select the Team project, Repository, and branch main.
Select “Empty Job”
Name the pipeline
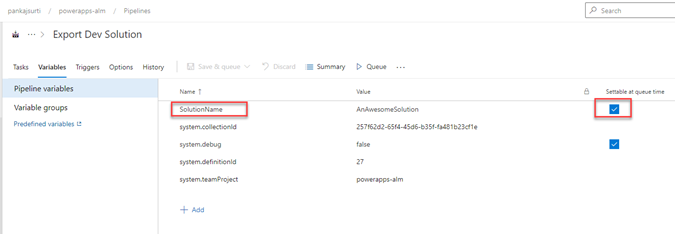
2. Add SolutionName as Build variable
Set the variable as SolutionName for build and release pipelines. Select “Selectable at queue time” and “Selectable at release time”
3. Create “Export Dev Solution” Build pipeline
Export Dev Solution Build pipeline
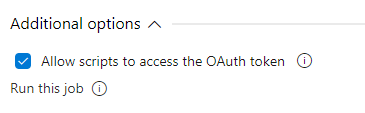
Please make sure you have “Allow scripts to access the OAuth token” is checked for the Agent Job.
** Use the values from here to put in the actions input **

Power Platform Export Solution
Solution Name : $(SolutionName)
Solution Output File : $(Build.ArtifactStagingDirectory)\$(SolutionName).zip
UNSELECT EXPORT AS MANAGE SOLUTION

Power Platform Unpack Solution
Solution Input File = $(Build.ArtifactStagingDirectory)\$(SolutionName).zip
Target Folder to Unpack Solution : $(Build.SourcesDirectory)\$(SolutionName)

Command Line Script

Display name: Command Line Script

Script :
echo commit all changed
git config user.email "pankaj_surti@hotmail.com"
git config user.name "Automatic Build"
git checkout main
git add --all
git commit -m "solution init"

echo push code to new repo
git -c http.extraheader="AUTHORIZATION:bearer $(System.AccessToken)" push origin main

NOTE:
To make the above script work you must give the contribute allow access to the Build service under project settings.
Please refer to 1 of 2 (Prerequisites) step # 6 "Add Build Service as Contribute Allow permission for the new repository"
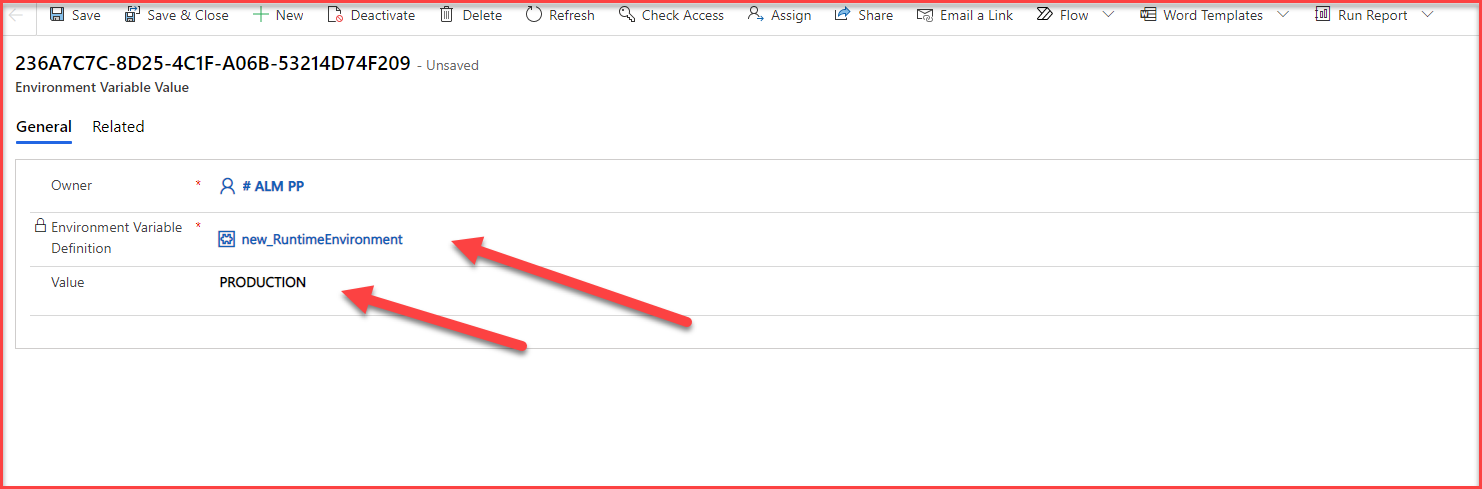
To Change the environments variables for the managed solution.
The managed solution will be in locked mode and you will not be able to change the environment variables. The following are the steps to change the environments variables.
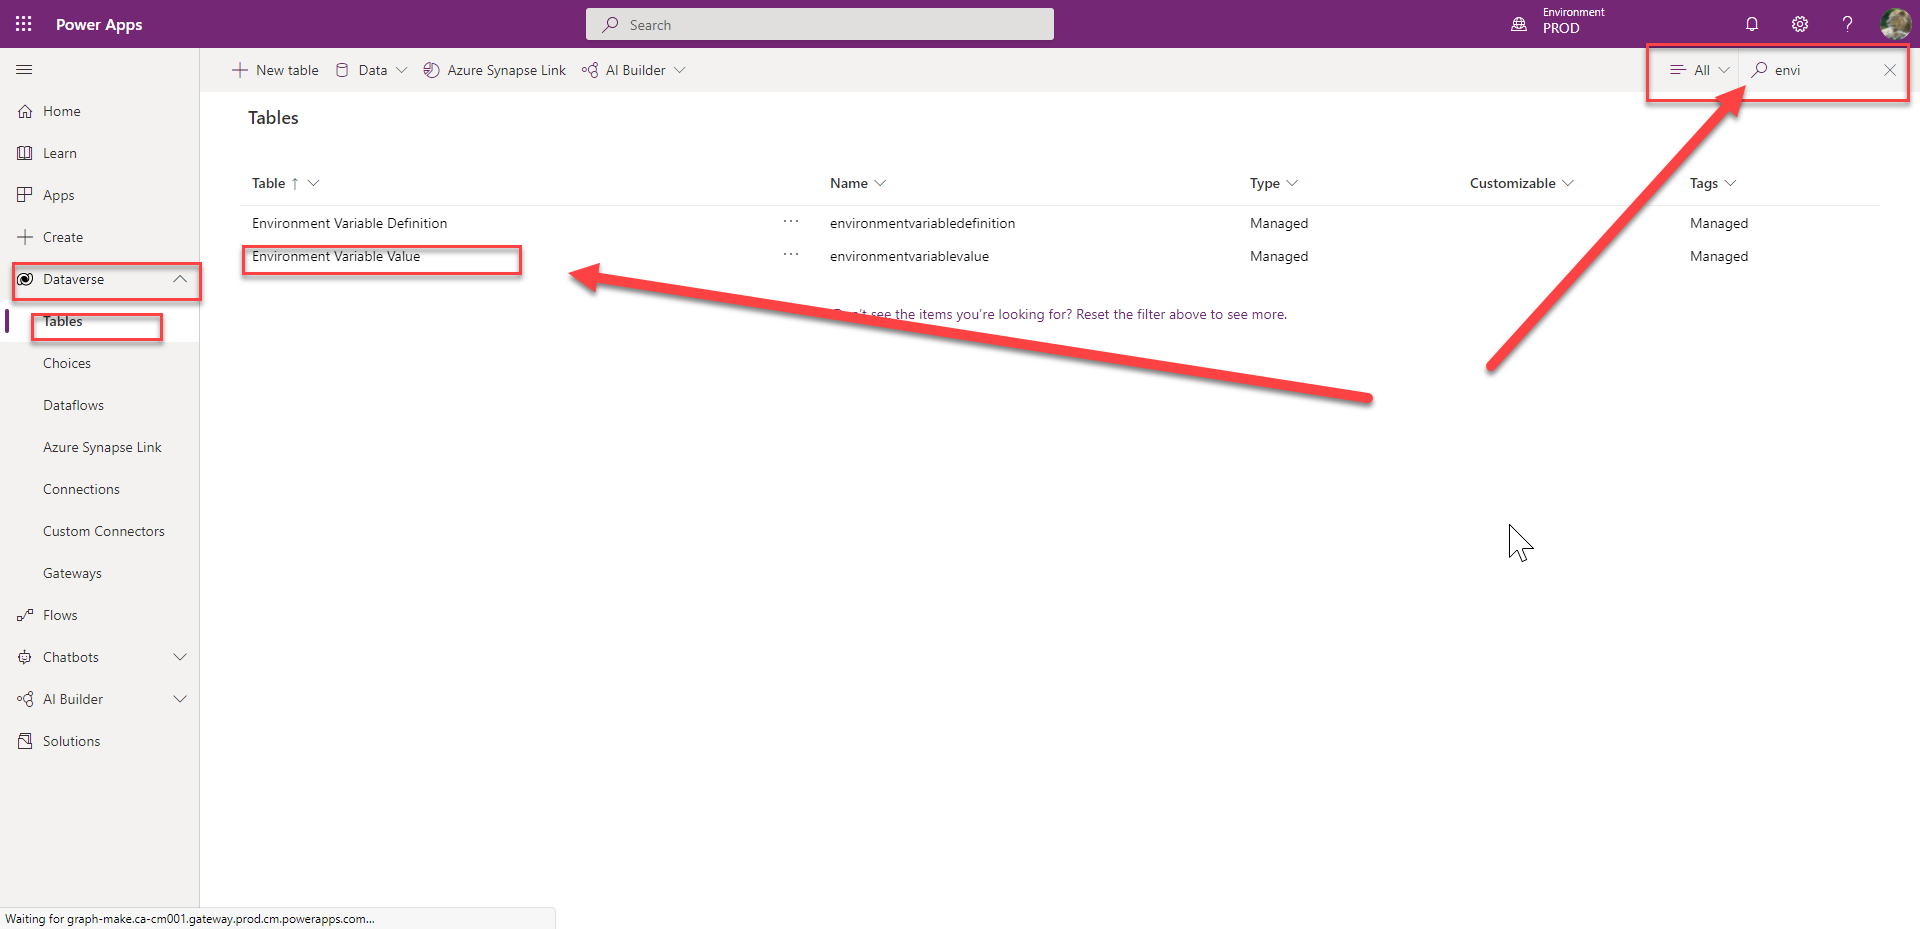
Navigate to the PROD environments using Power Platform Admin Center
Click on the Tables under Dataverse on the left side menu
Search for ‘Environment Variable Value’
‘Environment Variable Value’ table
Click on the ‘Environment Variable Value’ table and navigate to the ‘Data’ tab (as shown below)
Click on the Data tabClick on Edit to change the value and click Save & Close
For more details follow the following lab materials.
This is a three-part series of blog articles. Part1 (this one) article covers prerequisites to set up ALM in Azure DevOps. Part2 article covers the Power Platform Build Tools to build and deploy the solution. Part3 article covers the Microsoft Power Platform CLI to build and deploy the solution.
For both Part2 or Part3 approaches, you will need the following steps completed as a prerequisite. From numbers 1 to 5 you will need as a prerequisite for both approaches.
If you are following the Part2 approach you will additionally need numbers 6 and 7 as a prerequisite.
Prerequisites
1. Create a free Azure DevOps subscription.
Follow this article to get a free five-user Basic Plan Azure Subscription.
Azure DevOps Basic Plan is free for up to 5 users
2. Create three Power Platform Environments for DEV, PRE PROD, and PROD.
The three power platform environments.
3. Create an Azure AD app
Create an Azure AD app with the permissions
Need following delegated permissions and consented by Global Admin
Dynamic CRM / user_impersonation / Access Common Service as organization users
PowerApps Runtime Service / user_impersonation / Common Data Service
PowerApps.Advisor / Analysis.All
Note: Save the ClientId, ClientSecret & TenantId information of the Azure AD app. You will need this later.
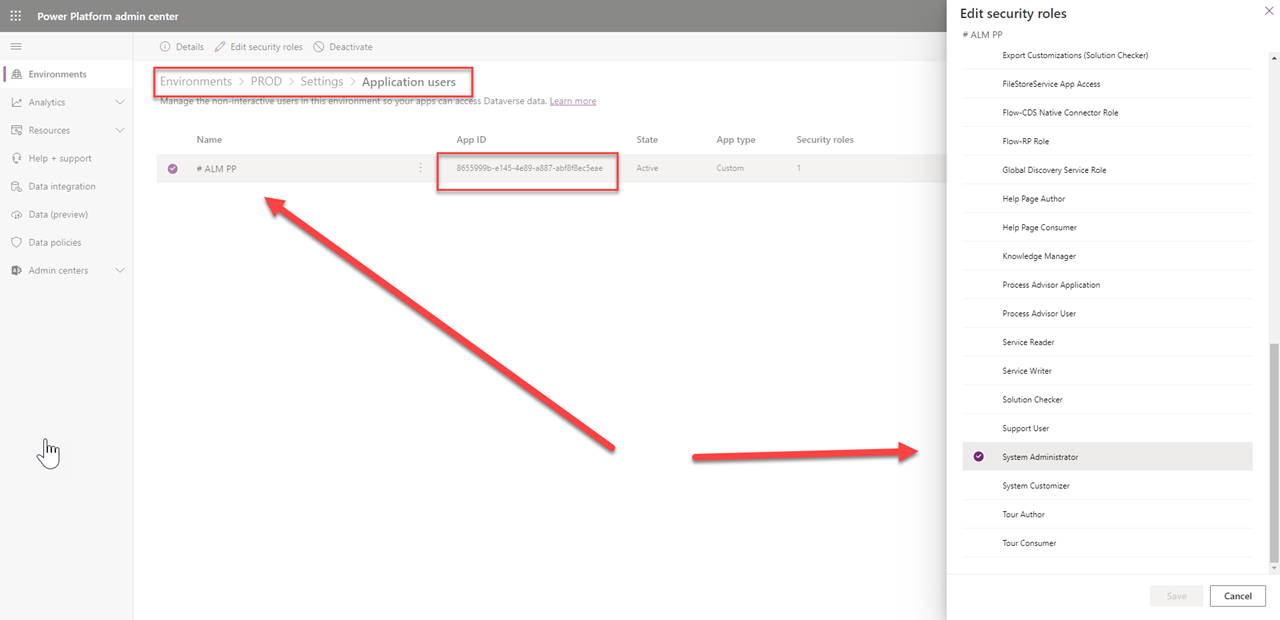
4. Add Application users to the Power Platform environment
Select Users + permissions and click on Application users
Click on New app user then click on Add an app
Select the Azure AD app created from the above step. Click Add and next screen click Create.
Add application users to Power Platform Environments
Using the above created Azure AD app add the application user for the Power Platform. Set the role as System Administrator. This application user will be used in the automation of the build and release pipelines.
5. Add Build Service as Contribute Allow permission for the new repository
Click on Project Settings
Click on Repositories under Repos
Select the repository in this case CRM446838
Select Security tab
Select the “{Project name} Build Service (pankajsurti)” Note: your project name and user name will be different.
Select Contribute as Allow/
Add Contribute allow permission for the repository
6. Add Power Platform Build Tools extension for Azure DevOps. (Part2)
NOTE: ONLY needed for PART2.
Power Platform Build Tools
7. Add Service Connection in Azure DevOps (Part2)
NOTE: ONLY needed for PART2.
Click on Project Settings
Click on Service connections under Pipelines
Click on Create service connection
Select “Power Platform” and click Next
Add Service URL, Tenant ID, Application ID, Client secret of Application ID, and provide a name of the service connection such DEV, PREPROD or PROD depending on whatever environment URL you are connecting to.
Add service connection
Conclusion
This completes this blog post. Once executing prerequisites you can refer to Part2 or Part3 depending on what tool you want to use for your need.
Login to your SharePoint site. Go to Graph Explorer, https://aka.ms/GE, enter the following request call, assuming tenant as m365x162783 and site as Test1.
You will get a response something like the following.
{
    "@odata.context": "https://graph.microsoft.com/v1.0/$metadata#sites(id)/$entity",
    "id": "m365x162783.sharepoint.com,2e0ad342-19b2-4116-b6a5-2dc4867cb498,0efde304-9646-43d8-8eee-5b1a55ab17f1"
}

What you get back in the id is in this format:

{hostname},{spsite.id},{spweb.id}
The Graph Explorer request-response
Conclusion
This is a simple way to get this sites-id information for any future MS Graph API calls if you may want to explore using PostMan or RESTClient.
However, if you want to make this call in your code you will need an access token and make a similar call as above to get the information.
$tenantPrefix = "m365x162783";
$clientId = "Client-ID";
$clientSecret = "Client-Secret";
$tenantName = $tenantPrefix +".onmicrosoft.com";
$tenantDomain = $tenantPrefix +".sharepoint.com";

#Provide site url
$sitePath = "https://m365x162783.sharepoint.com/sites/Test1"
$siteName = $sitePath.Split("/")[4]

# use splatting
$ReqTokenBody = @{
Grant_Type    = "client_credentials"
Scope         = "https://graph.microsoft.com/.default"
client_Id     = $clientID
Client_Secret = $clientSecret
}
$TokenResponse = Invoke-RestMethod -Uri "https://login.microsoftonline.com/$TenantName/oauth2/v2.0/token" -Method POST -Body $ReqTokenBody

$apiUrl = 'https://graph.microsoft.com/v1.0/sites/'+ $tenantDomain +':/sites/'+ $siteName +'?$select=id,displayName'
try {
  $spoResult = Invoke-RestMethod -Headers @{Authorization = "Bearer $($Tokenresponse.access_token)"} -Uri  $apiUrl -Method Get
  Write-Host "Site:" $spoResult.displayName
}
catch {
  Write-Output "Failed to enumerate the site"
  Write-Host "StatusCode:" $_.Exception.Response.StatusCode.value__
  Write-Host "StatusDescription:" $_.Exception.Response.StatusDescription
  Exit
}

# NOTE THE SITES-ID is passed for the next call.
$apiUrl = 'https://graph.microsoft.com/v1.0/sites/'+ $spoResult.id +'/permissions'
For my customer, even after multiple messages to the Admins and Owners there was not an immediate action taken by the owners. To alert ‘SharePoint 2010 workflow retirement’ to all the identified sites my customer wants to add a banner similar to the following.
Banner for site with SharePoint 2010 Workflow
Solution
Prerequisite
You should have the PnP PowerShell installed.
You should have the SPFx development environment to create the .sppkg SPFx package.
You should have configure and consented for PnP PowerShell on your tenant. Please follow this article.
Step # 1 : Create and install the SPFX application customizer for the modern site or page
# make sure the PS1 and js files are in the same directory i.e. c:\SP2010RetirementBanner

.\Process-AddRemoveBanner -ActionType "Remove"
Conclusion
This approach is only an awareness to the end users to think about the issue of the SP2010 workflow will retire soon so they can migrate to modern workflow using Power Automate.