After following the steps and I tried to debug I got the following error.
When I searched for the solution on the web I saw Vesa mentioned with a tip that the web server may not be running. I did run “gulp server” and it should run the local web server.
I did more search and I got some suggested posts to delete the browser cache, log out from the SPO site.
Nothing worked.
Resolution
I went back to the documentation step by step, I have missed the following step.
To customize a SharePoint list or library form by using Power Apps is well documented. You can visit this link to see the details. But the issue with this approach is the form does not work as the full-screen mode app. You may want to create a blank canvas app in full-screen tablet mode.
If you want to associate your existing full-screen canvas app with the SharePoint list, please read further…
Step By Step Solution
The solution is very simple, you still need to create a custom form as mentioned in the above link. You will change the SharePointIntegration Controls OnNew, OneEdit, and OnView properties to launch your full-screen canvas app. You would use the Launch method.
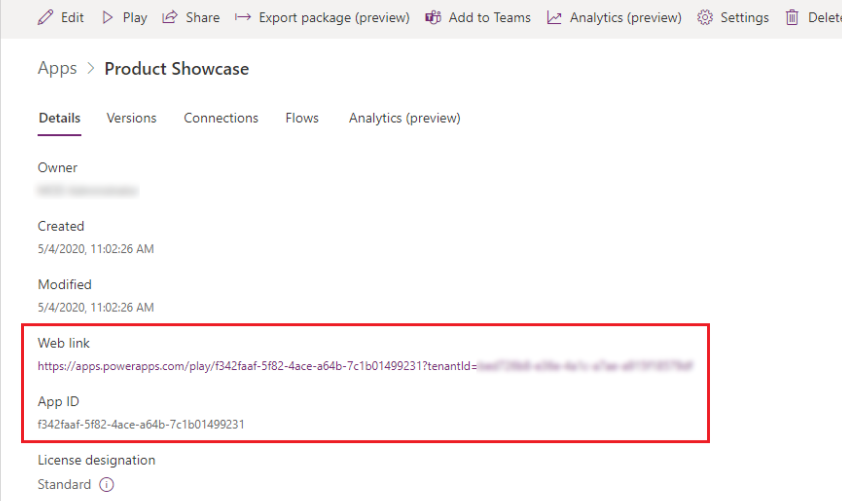
Step # 1 Get the Launch URL for your Full-Screen Canvas app. Follow here
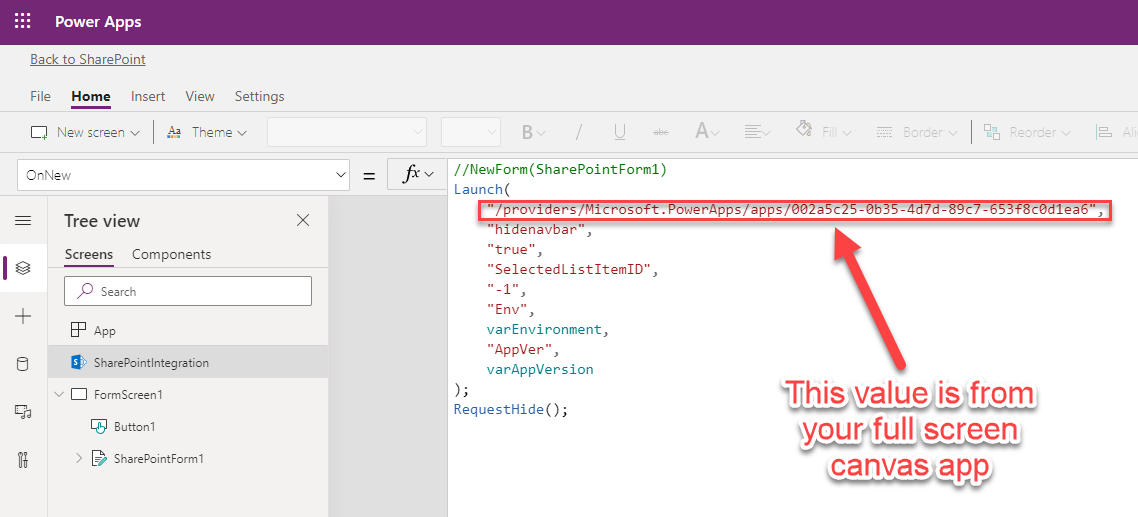
Step # 2 In your customize app go to SharePointIntegration Control. Modify OnNew with the code as defined below.
Note: there are four query strings passed to the launch.
hidenavbar -> is to hide the navigation bar for your full-screen app.
SelectedListItemID -> This will be used in the full-screen app to navigate used to NewForm, EditForm or ViewForm
Env and AppVer -> These are optional if you want to pass some environment or version information. You can skip if you like.
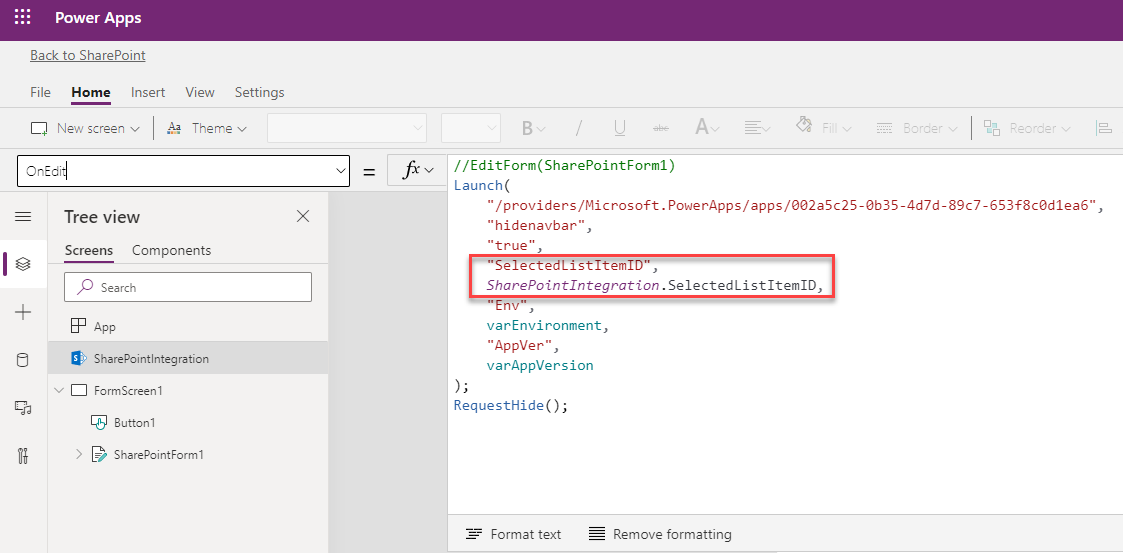
Step # 3 In your customize app go to SharePointIntegration Control. Modify the “OnEdit” event with the code as defined below.
Everything is same as the Step # 2 except the SelectedListitemID property is different.
SharePointIntegration control’s OnEdit property.
//EditForm(SharePointForm1)
Launch(
    "/providers/Microsoft.PowerApps/apps/002a5c25-0b35-4d7d-89c7-653f8c0d1ea6",
    "hidenavbar",
    "true",
    "SelectedListItemID",
    SharePointIntegration.SelectedListItemID,

    "EditMode",
    "yes",
    "Env",
    varEnvironment,
    "AppVer",
    varAppVersion
);
RequestHide();

**** NOTE for OnView event ****
Repeat the above code for the OnView with "EditMode" as 'no' or just don't pass it, the default can be coded as 'no'
Step # 4 Modify the OnStart Event of your Full-Screen App.
OnStart event for the Full-Screen Canvas App
// Read all query string parameters
Set (
    varSelectedListItemID,
    Value(Param("SelectedListItemID"))
);


Set(
    varEditMode,
    Coalesce(
        Param("EditMode"),
        "No"
    )
);
// These variables are optional, you can use to display the version and env.
Set(
    varAppVersion,
    Coalesce(
        Param("AppVer"),
        "17.0"
    )
);
Set(
    varEnvironment,
    Coalesce(
        Param("Env"),
        "Development"
    )
);
Step # 5 Act on the value of the SelectedListItemID property in the full-screen canvas app. The following code is still in the OnStart event. This will make SharePoint List record new or edit based on the varSelectedListItemId.
/// You need to change your DataSource to your SharePoint List
// If the ID is greater than zero and editmode is yes then just
//      get the record for that ID
// If ID is -1 means user clicked on New
If (
    varSelectedListItemID > 0 && Lower(vaEditMode) = "yes",
    Set(
        varCurrentlySelectedRecord,
        LookUp(
            [[[ YOUR DB SOURCE ]]],
            ID = varSelectedListItemID
        )
    );
    If (
        Lower(vaEditMode) = "yes",
        EditForm([[[ YOUR Edit form ]]]);
        Navigate(
            [[[ YOUR ADD/EDIT SCREEN],
            ScreenTransition.Cover
        );
        , // NOTE: This is the else part, assume this means View.
        ViewForm([[[ YOUR Edit form ]]]);
        Navigate(
            [[[ YOUR View SCREEN],
            ScreenTransition.Cover
        );
    );
);
// if the ID is -1 that means the user wants to create the record.
//
If(
    varSelectedListItemID = -1,
    Set(
        varCurrentlySelectedRecord,
        Defaults([[[ YOUR DB SOURCE ]]])
    );
    Set(
        varEntryType,
        "New"
    );
    ResetForm(AESForm);
    Navigate(
        AddEditScreen,
        ScreenTransition.Cover
    );

);
Conclusion
In the above few steps, you can associate the full-screen PowerApps to the customize SharePoint List. The technique is simple the customized form will launch the full-screen PowerApps.
I hope this is helpful to you. Please post any comments you may have.
I needed to restrict the date selection in the Power Apps form to only allow Tuesday and Thursday.
Step By Step Solution
I assume you know how to create Power Apps form app.
Step # 1 I the BorderColor property of the Date control (in my case DateValue2) put the following formula. The Weekday function will provide the number for Tue and Thu.
// if parent error is blank or
//    selected date is Tue or Thu the border color is normal
If(
    Coalesce(
        (Weekday(
            DateValue2.SelectedDate,
            StartOfWeek.Sunday
        ) = 3) ||
        (Weekday(
            DateValue2.SelectedDate,
            StartOfWeek.Sunday
        ) = 5),
        IsBlank(Parent.Error)

    ),
    Parent.BorderColor,
    Color.Red
)
BorderColor
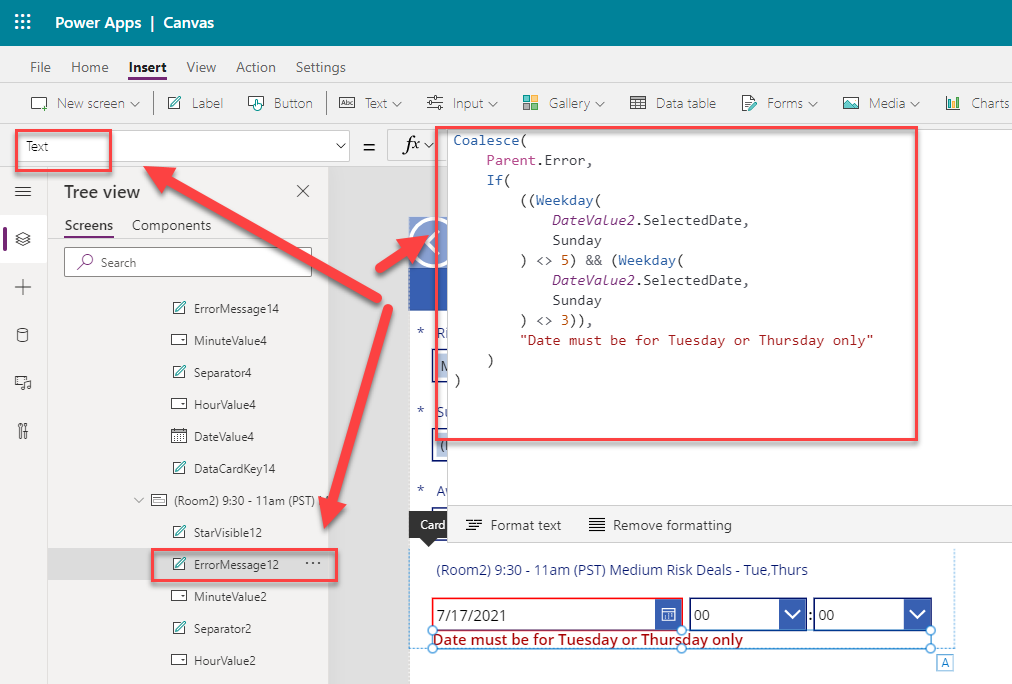
Step # 2 In the Text property of the ErrorMessage Control of the DataCard add the following formula.
Coalesce(
    Parent.Error,
    If(
        ((Weekday(
            DateValue2.SelectedDate,
            StartOfWeek.Sunday
        ) <> 5) && (Weekday(
            DateValue2.SelectedDate,
            StartOfWeek.Sunday
        ) <> 3)),
        "Date must be for Tuesday or Thursday only"
    )
)
Text property
Conclusion
Currently, the out of the box date control does not provide any validation, this is an alternative approach to validate and restrict the days. I hope it is useful to you for your scenario.
During the development of PowerShell Script or Power Automate Flow with REST calls you will need a Static Names of the List. The Display name of the list is not same as static name.
Please read here for more information about the Display Name Vs Static Name.
Step By Step Solution
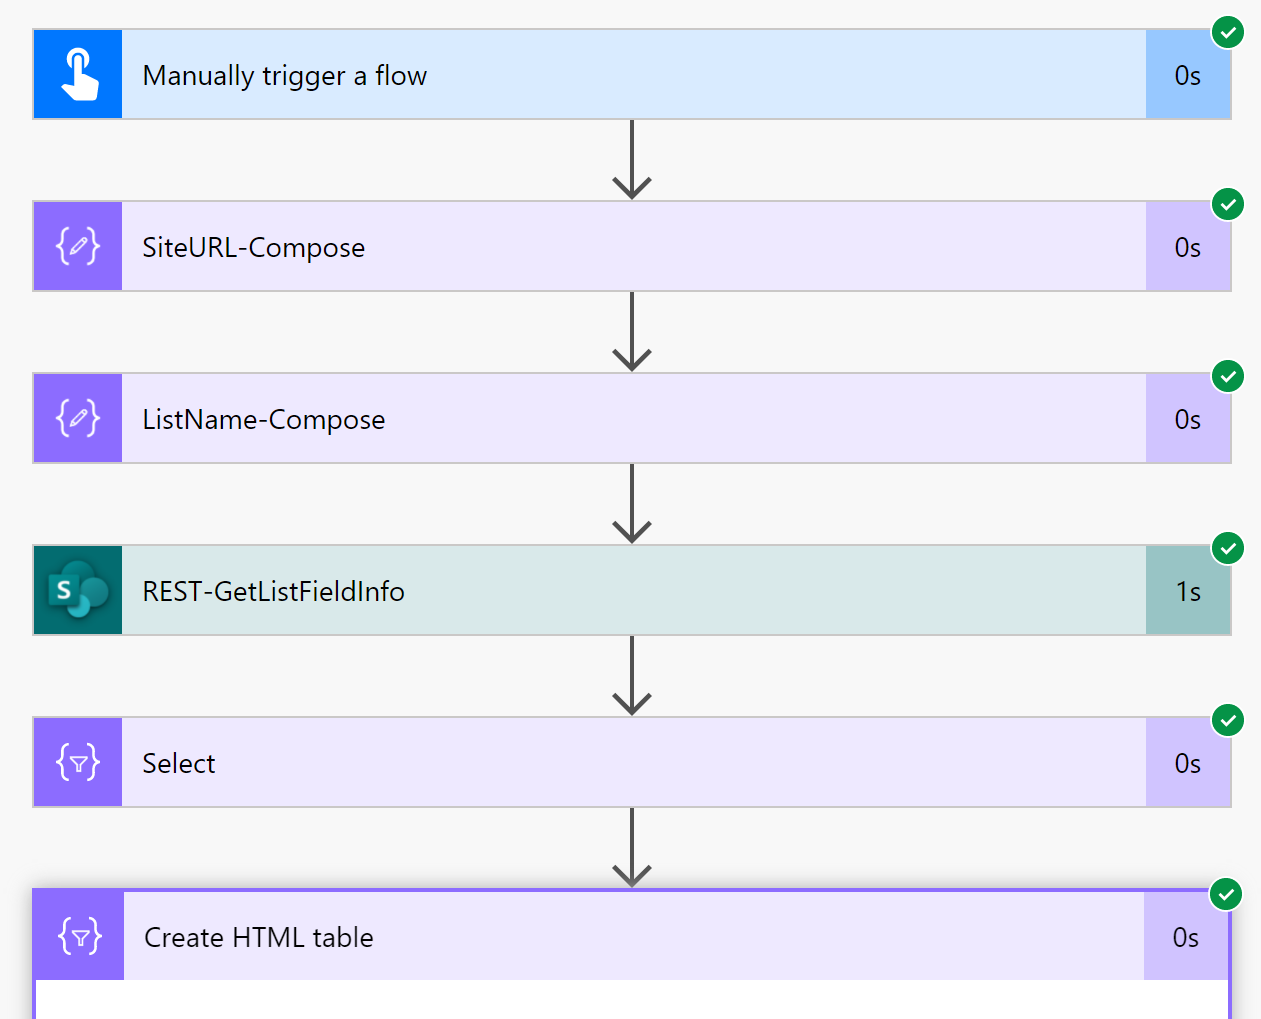
To simplify let’s create a simple Manually Triggered flow. Using the REST API make a call to the get Fields information in JSON. Map using the Select action to get only required field properties. After that apply the Create HTML action to create nice tabular data to see the map.
Here is the scenario, there is a list named “OrderList” with the following five fields. The end users change any of these fields except Order Status. The Order Status field is changed externally.
Field Name
Field Type
OrderID
Number
Order Name
Single line of text
Order Status
Choice (New, Approved, Shipped, Completed)
Quantity
Number
Order Description
Multiple lines of text
OrderList fields
The need here is when the Order Status change from one state to other the Power Automate Flow has some business logic. The question is how to check only the Order Status has changed from old value to new value. For example, Approved to Shipped status has multiple business actions and emails to be sent.
The solution to such need is to enable the “versions” in SharePoint List.
Step By Step Solution
Note: Please make sure you have enabled versions for your SharePoint List.
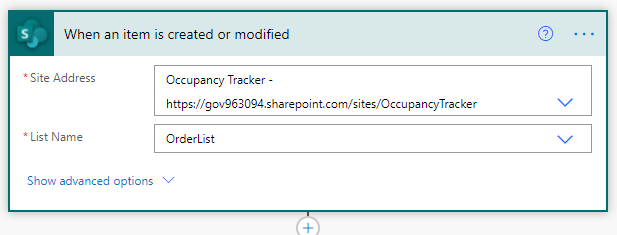
Step # 1 Create “When an item is created or modified” trigger flow
In this step select Site Address and the List Name.
Flow Trigger
Step # 2 Make REST call using HTTP to get top 2 versions of the item
Make a REST call using Send HTTP Method to get last two versions
# copy the following in Uri, make sure you change list name
_api/web/lists/GetByTitle('OrderList')/Items(@{triggerOutputs()?['body/ID']})/versions?$top=2

# copy the following values in Headers

{
  "accept": "application/json;odata=nometadata"
}
The above call will provide the results in the following format. The value JSON array has the data we need to extract the old and new values for the order status. The first value is the New value and second item in the array is an old value of the Order Status. e.g. the below data clearly shows that the Order Status was changed from New to Approved.
{
  "value": [
    {

      ... removed other data for the brevity
      "VersionId": 3584,
      "VersionLabel": "7.0",
      "ID": 1,
      "OrderName": "Laptop",
      "OrderStatus": "Approved",
      "Quantity": 11,
    },
    {

      ... removed other data for the brevity
      "VersionId": 3072,
      "VersionLabel": "6.0",
      "ID": 1,
      "OrderName": "Laptop",
      "OrderStatus": "New",
      "Quantity": 11,
    }
  ]
}
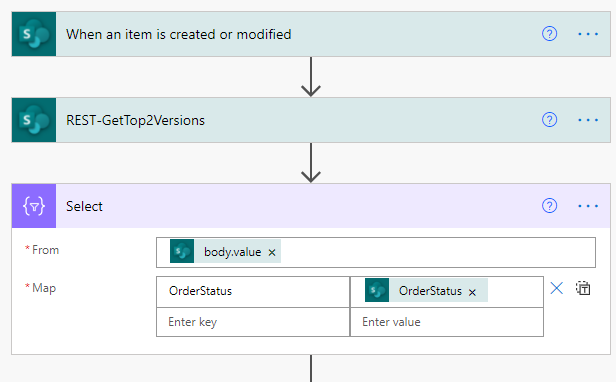
Step # 3 Extract the field values using Select operation
Us Select to extract only the OrderStatus field’s last top 2 versions we need.
# use the following formula in the From.
outputs('REST-GetTop2Versions')?['body']?['value']
# use the following formula in the Map
item()?['OrderStatus']
Step # 4 Store the OrderStaus’s New and Old value to variables
Storing Order Status New and Old values
# for New OrderStatus value us the following formula
first(body('Select'))?['OrderStatus']


# for Old OrderStatus value us the following formula
last(body('Select'))?['OrderStatus']
Step # 5 Using the New and Old variables do the comparison to take business action.
The final step is now up to your business actions. Basically you can use the above two old and new variables to do the comparison if the value have changed, or if values have changed.
Conclusion
There is no out of the box trigger to Tigger on the field. This is a simple ways to find out field values changing.
Have you seen the following error in your Power Automate?
“Actions in this flow may result in an infinite trigger loop. Please ensure you add appropriate conditional checks to prevent this flow from triggering itself.“
If your answer is yes, then please keep reading…
As you can see the warning is telling you “it may” and you need to “add appropriate condition checks”.
So to demonstrate that, I am going to create a scenario to get this warning and address it. I will create a simple custom list (named InfiniteLoop) with a default ‘Title’ field. Then I will create a flow with a trigger “When an item is created or modified”. In this flow, I will use a random number generator function rand to generate a random number from 1 to 75. The flow will append the generated random number to the Title field and call Update item.
After all that, it will show me a warning in the Flow checker as seen below.
# code for the compose is
concat ( ' ' , rand(1,75))

# code for the Update 'Title' is

concat ( triggerOutputs()?['body/Title'], outputs('Compose'))
Step By Step Solution
There are multiple ways to solve this infinite loop issue.
You need to add a trigger condition to your flow so it only fires when condition is met and does not fire back again after update item in your flow.
Solution # 1 : Utilize ‘Modified By’ field as the trigger condition.
Basically, what you want here is to set a trigger condition to check “Modified By” Email is NOT equals to a user’s email(flow author’s email). In my scenario BobK created the flow.
You can simply copy paste the following formula to the Trigger Condition, and change the email address appropriately.
# First modify by check email is null,
#             if yes, return true
#             if no,  convert to lower case and compare to flow author
# Make sure to change the email address after copy and paste

@if(equals(triggerOutputs()?['body/Editor/Email'],null), true, not(equals(toLower(triggerOutputs()?['body/Editor/Email']),'bobk@gov963094.onmicrosoft.com')))
Settings Dialog for “When an item is created or modified” trigger.
NOTE: Please make a note, if the Flow Author user makes a change to the list item, the flow will not trigger. This is a downside of this technique. If you are a flow author and you will not be end user to update the list items this technique will work great for you.
Solution # 2 : Create a Copy of the field to do compare.
In this technique for above summarized scenario. I will create a new field e.g. “Title_Copy”. This field will hold the copy of the data from the “Title” field. The new Title_Copy field will be hidden from the user. The copy will be made in the flow with update item.
The list showing the Title and Title_Copy fields.
The flow will have a trigger condition to check if the “Title” and “Title_Copy” are NOT equal. If they are not equal that means the user has made the change to the Title field. So allow flow trigger to fire.
If they are equal that means the change is made by the flow at the time of the update. So do not allow trigger to fire.
# To fire the trigger, check if the Title and Title_Copy are NOT equal.

@not(equals(triggerOutputs()?['body/Title'],triggerOutputs()?['body/Title_Copy']))
The flow with Title and Title_Copy
Solution # 3 : Create a Copy of the field to do compare for more than one fields.
So far ok if you were only interested in the one field user makes the modification. What if you have more than one field which your flow is interested to check whenever a user makes a modification. The above #2 technique may need to be adjusted.
Basically, you will make a master Copy filed with multi text type. This field will be hidden similar to the #2 solution. This field also will be updated in the flow.
But update will be concatenation of the all required fields your flow want to trigger on.
To be continued… (I will complete this later as I get time)
Conclusion
As you can see there are multiple ways you can avoid infinite loop. Please let me know your comments.
I want to find out the User’s OneDrive for Business url or personal site. I also want to find more such user properties for the user with UPN, such as when the personal site created, if not created what is the state of the personal site etc. You will find all this information here.
Step By Step Solution
It is very simple to do but before you run the PnP.PowerShell command make sure you follow prerequisite for connecting to the new tenant. This is a good article.
In short, you need to call Register-PnPManagementShellAccess and accept the consent. This will create the Azure AD app Service Principal in your tenant.
After that you can call the following scripts to get all User’s OneDrive URL.
Connect-PnPOnline -url https://gov963094-admin.sharepoint.com/

$p = Get-PnPUserProfileProperty -Account 'admin@GOV963094.onmicrosoft.com'

$p.PersonalUrl

### OUT PUT is ###
### https://gov963094-my.sharepoint.com/personal/admin_gov963094_onmicrosoft_com/

$p.UserProfileProperties

### OUTPUT of above will provide all the properties.
If you notice there are properties for the Personal Site with information such as what and when the personal sites were created or enqueued.
A customer showed a working Power Automate for an item created trigger. There was an approval action in the flow so technically only one email should be sent for a new item. But she noticed multiple approvals emails were sent. This was no way possible.
Our suspicion was there may more than one flow associated to the list. What if, this flow was duplicated by someone and that also started running for an item created event.
The question is, how do we find out how many flows are associated to the list?
The answer is to make a call to the SyncFlowInstances to the list to find all associated Power Automate Flow.
Step By Step solution
Step #1 First, create a Manually Triggered Power Automate Flow.
Step #2 Add “Sent an HTTP request to SharePoint” action
Make a call to SyncFlowInstances
Copy paste values to your ” Sent an HTTP request to SharePoint” action. Make sure to change the list name below, my list name is MasterSiteInventory yours may be different.
The above call returns a response in the FlowSynchronizationResult. The intent now will be to get the data from the FlowSynchronizationResult.SynchronizationData property. This property stores value as JSON string as seen in the below sample data.
Step # 3 Now parse and convert the above SynchronizationData JSON string to HTML
Add a Compose action with the following formula. As you can see the data is converted first to JSON and then we access the value property. The value property is a JSON array.