
Summary
I was tasked to get Sandbox Epic test data using FHIR APIs. This article will briefly demonstrate how to setup the App on Epic?, How provide required permissions for the App? and How to call the API using the Postman.
Prerequisites:
You will need register and log in on the Epic on FHIR.
To sign up you will need a company email and web sites.
You will need to create the App and Secret.
Step by Step Solution
You can follow the steps from here to create a new App.
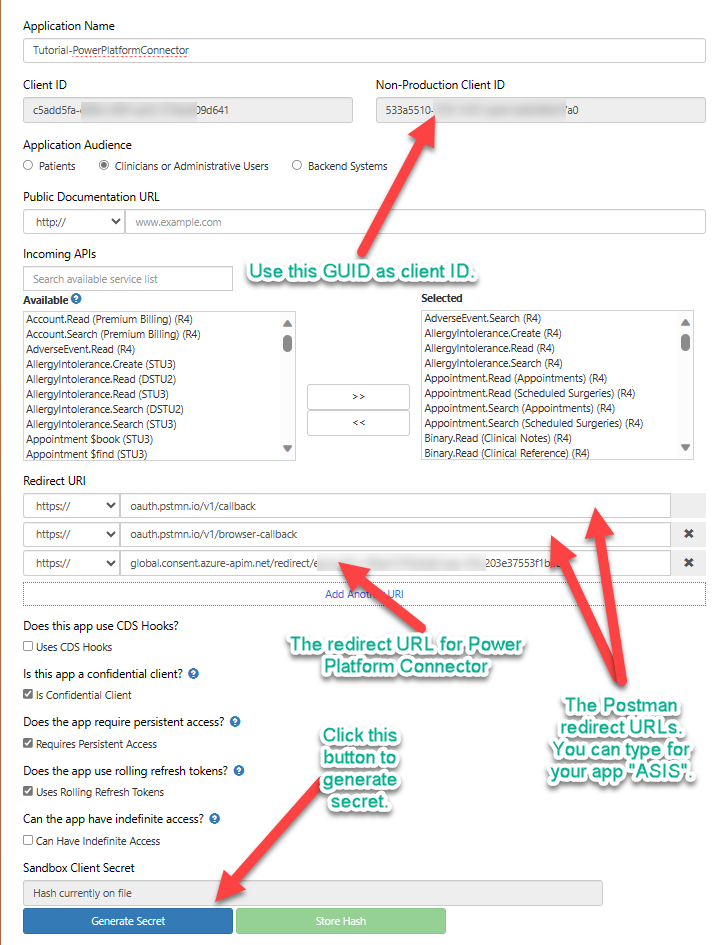
The documentation has some missing information on the creation of the app secret. The following information worked for me to create the app secrect.
Using following repository you can import the Environments and Postman collections.
https://github.com/pankajsurti/EPIC-FHIR/
After importing the environments, set the environments variables as following.
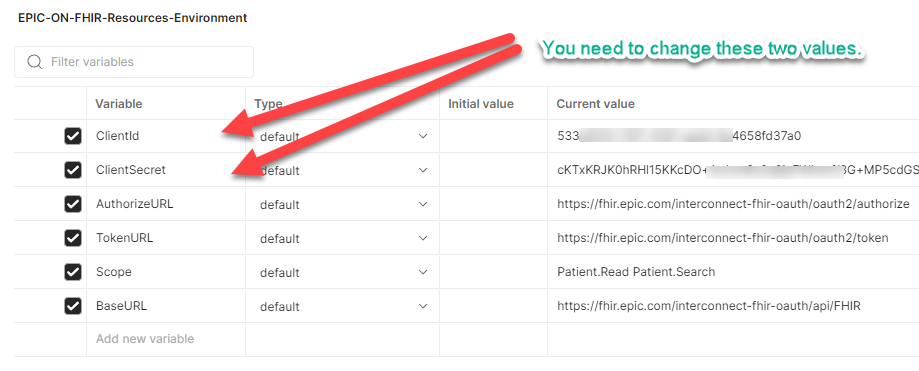
| Variable | Current value |
| AuthorizeURL | https://fhir.epic.com/interconnect-fhir-oauth/oauth2/authorize |
| TokenURL | https://fhir.epic.com/interconnect-fhir-oauth/oauth2/token |
| Scope | Patient.Read Patient.Search |
| BaseURL | https://fhir.epic.com/interconnect-fhir-oauth/api/FHIR |
Getting the Token.
Open the Postman collection. Go to the Top Folder “Epic_Sandbox (R4). Click on Authorization tab. At the bottom click on the “Get New Token”. You will be redirected to the Login in page.
Note: Please use the user id and password from Sandbox test data page. Please note based on what you have selected in your app you can use patient’s login or the provider’s login.

Once you have the token you can make a call to the Read or Search for the Patient entity. You can experiment with various other FHIR (R4) resources. But keep in mind you will need to the Scope variable in the environments settings.
Conclusion
This blog post will help you how to get the Epic Sandbox data using the Postman. There are more steps to the get the production data. You will need to talk to Epic support and your customer to get the correct production FHIR Url. It is beyond the scope of this post.
Here are list of the FHIR endpoints for various Epic installation.
The next you can do it to create the Power Platform Connector using this Postman collection. You will need to setup the security and set redirect url in the Epic app.
I hope this helps you.


