
Summary
A colleague asked me how to get a notification when anyone creates a Team on MS Teams? The answer is pretty simple you would use the MS Graph Notification API. There is an MS Learn session here.
What I will write in this blog post is to answer the above question using Power Automate. I will create two applications.
- One to listen to the notification sent for the create or change of team, aka Web Hooks.
- One for subscribing to the notification API. For simplicity, I will make use of the Graph Explorer tool for it.
Prerequisite
- You will need Power Automate Premium license for creating HTTP request trigger.
- You will need a Consent “Group.ReadWriteAll” permission for Graph Explorer.
Step by Step for Web Hook
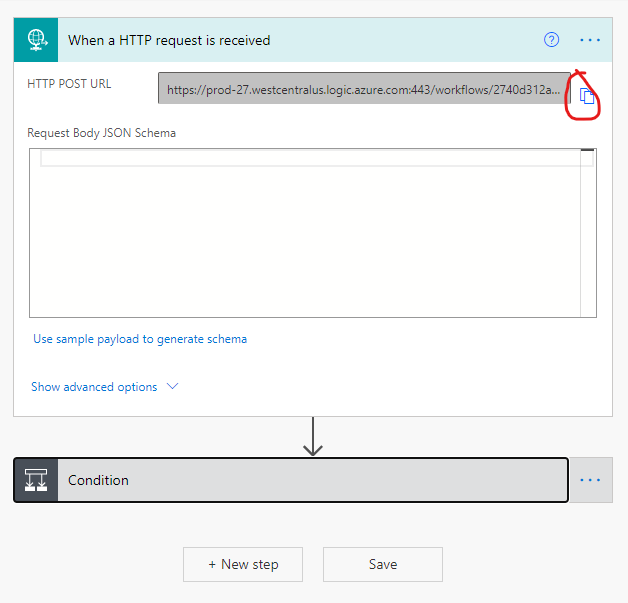
Step # 1 First you will need an “When a HTTP request is received” trigger.
Please copy the ‘HTTP POST URL’ to a clipboard. (You will need this value later)
Step # 2
Create a condition for this WebHook to check whether there is any ‘queries’ parameter passed. If passed then read and send back the validationToken with 200 OK.
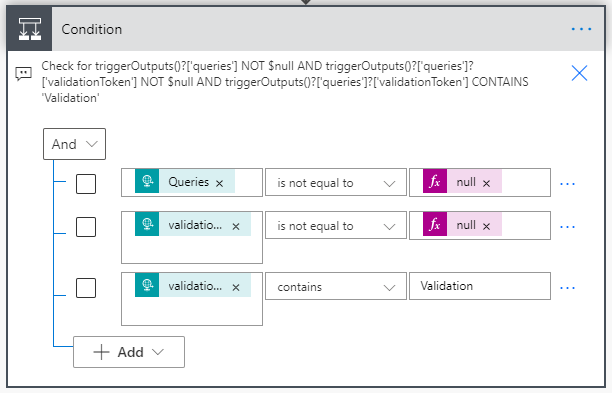
Check for following condition. Please put the '?' in the equation, it is important.

triggerOutputs()?['queries']                     is not equal to $null      AND
triggerOutputs()?['queries']?['validationToken'] is not equal to $null      AND triggerOutputs()?['queries']?['validationToken'] contains        Validation
Step # 3
If the condition is success to send back the validationToken.
If condition is not successful that means the notification is received with the body.
For above Condition TRUE
###
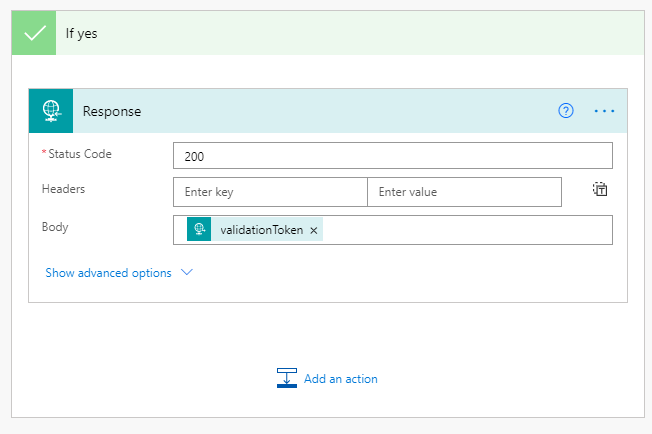
This is a very IMPORTANT step, you must send the response back with 200 OK with body of the validationToken. Use the following expression to send the validationToken
###
triggerOutputs()?['queries']?['validationToken'] For above condition FALSE

In the false condition, you should process the body value. The body value will have the notification information with the change Type and resources ID. Please note that there will not be additional data for the resource, if needed then you will have to write the code to get that information using the resource ID. Finally, you will need to send the 200 OK response with no body value acknowledging that you have received the notification no further notification will be sent.
Step By Step to Subscribe
Step # 1
To simplify this article I will use Graph Explorer to subscribe to the notification of the groups’ changes. It will require that Graph Explorer Tool has been consented to “Groups.ReadWrite.All” permission. If you do not consent the Graph Explorer will give you an error during the subscription.
changeType set to updated will receive notifications on the creation of a new group.

In Graph Explorer you will make a post request to the URI ‘https://graph.microsoft.com/v1.0/subscriptions’
## In the request body you would put the following JSON.
## In the notificationUrl put the above copies URL from Power Automate Trigger.
## Change the expiration date according to your time.
{
    "changeType": "updated,deleted",
    "notificationUrl": "[Paste Text from Step 1 of 'Step by Step for Web Hook'",
    "resource": "/groups",
    "expirationDateTime": "2021-04-10T00:00:00Z"
}
To consent for the Group.ReadWrite.All, in GE you would click on “Modify permissions” -> “Open the permission panel” -> Select Group -> Select “Group.ReadWrite.All”. Finally, you will need to click on the Consent button. Which will pop up a consent window, select OK. This action will create an Azure AD app on your tenant with the consented permission.

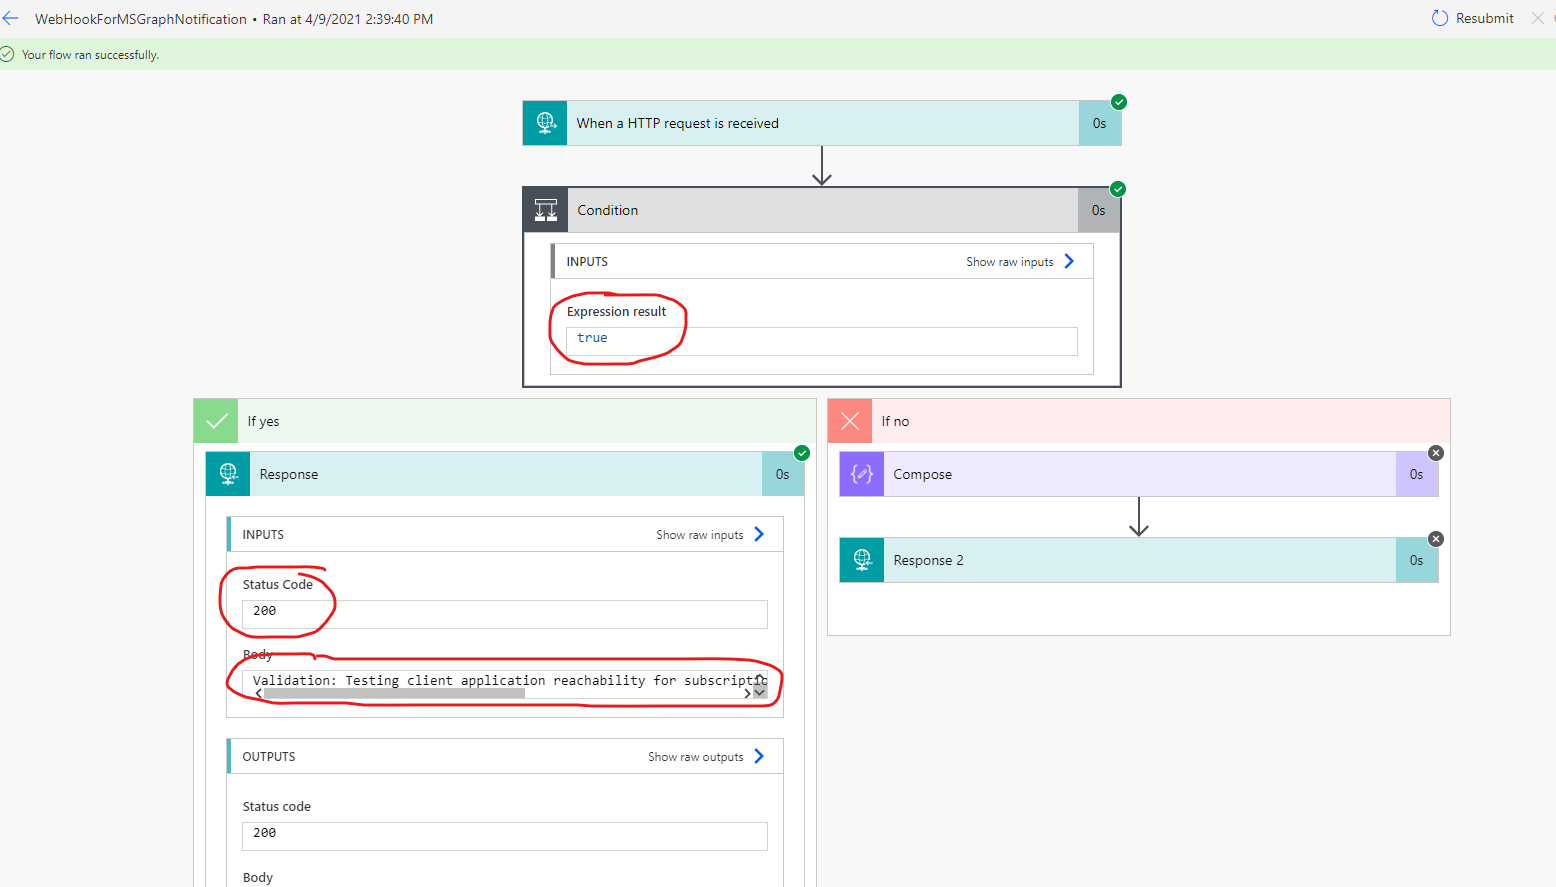
Finally you should see the following in the Power Automate Run mode when you subscribe.
The condition expression will be true. When it is true send the response back with the validationToken as a body.
Conclusion
The above article is an attempt to simplify to answer one question. A similar approach can be used for other supported notification types resources. You will need the consent to correct permissions.
